Ueberschalter: Unterschied zwischen den Versionen
Ollo (Diskussion | Beiträge) (→Skript) |
Ollo (Diskussion | Beiträge) (→Doku) |
||
| Zeile 94: | Zeile 94: | ||
= Mqtt = | = Mqtt = | ||
== Doku == | == Doku == | ||
Folgende Stati werden in MQTT geschickt: | |||
<code> | |||
/room/light/3/command off | |||
/room/light/1/state on | |||
/room/light/2/state on | |||
/room/light/3/state off | |||
/room/light/4/state on | |||
/room/light/5/state on | |||
/room/light/6/state on | |||
/room/light/7/state on | |||
/room/light/8/state on | |||
/room/light/3/command off | |||
/room/light/3/command off | |||
/room/light/3/command on | |||
/room/light/3/state on | |||
</code> | |||
Linux Befehl: | |||
$ mosquitto_sub -v -h 10.23.42.31 -t "/room/light/#" | |||
Eine Lampe kann mit folgenden Schema geschalten werden: '''/room/light/<id>/command (on|off)'''. | |||
Unter Linux wurde das wie folgt getestet: | |||
<code> | |||
$ mosquitto_pub -h 10.23.42.31 -t "/room/light/3/command" -m "off" | |||
$ mosquitto_pub -h 10.23.42.31 -t "/room/light/3/command" -m "on" | |||
</code> | |||
== Skript == | == Skript == | ||
Version vom 24. August 2014, 19:54 Uhr
Publikationen
Server
Hardware
- Raspberry Pi seriell stumm geschalten
- ioBoard Projekt auf Github
Das ioBoard wird über das UART des Raspberry Pis angesprochen. Die Kommunikation zum Raspberry erfolgt über Ethernet, es werden keine weiteren Schnittstellen benötigt.
Software
- raspbian (wheezy)
- ser2net
- lighttpd (optional für Webclient)
- Webserver-Projekt Unterordner web
Konfiguration
In der Konfigurationsdatei /etc/ser2net.conf von ser2net aktiviert man folgende Konfiguration. Alle weiteren können auskommentiert werden:
2001:raw:120:/dev/ttyAMA0:9600 NONE 1STOPBIT 8DATABITS -XONXOFF -LOCAL -RTSCTS
Webserver konfigurieren
$ cd /var/
$ sudo chown pi:pi www/
$ cd cd /var/www/
$ git clone https://github.com/C3MA/uberschalter
$ cd uberschalter/web/
$ make
Aktualiseren der lighttpd Konfiguration zu folgender (Muss ggf. erst installiert werden):
server.modules = (
	"mod_cgi",
	"mod_access",
	"mod_alias",
	"mod_compress",
"mod_redirect",
- "mod_rewrite",
)
- server.document-root = "/var/www"
server.document-root        = "/var/www/uberschalter/web/www"
server.upload-dirs          = ( "/var/cache/lighttpd/uploads" )
server.errorlog             = "/var/log/lighttpd/error.log"
server.pid-file             = "/var/run/lighttpd.pid"
server.username             = "www-data"
server.groupname            = "www-data"
server.port                 = 80


index-file.names            = ( "index.php", "index.html", "index.lighttpd.html" )
url.access-deny             = ( "~", ".inc" )
static-file.exclude-extensions = ( ".php", ".pl", ".fcgi" )
compress.cache-dir          = "/var/cache/lighttpd/compress/"
compress.filetype           = ( "application/javascript", "text/css", "text/html", "text/plain" )
- default listening port for IPv6 falls back to the IPv4 port
include_shell "/usr/share/lighttpd/use-ipv6.pl " + server.port
include_shell "/usr/share/lighttpd/create-mime.assign.pl"
include_shell "/usr/share/lighttpd/include-conf-enabled.pl"
$HTTP["url"] =~ "/cgi-bin/" {
cgi.assign = ( "" => "" )
}
cgi.assign      = (
".cgi" => ""
)
Client
Android
Web
Auf dem RaspberryPi läuft auch Webserver um die Lampen zu steuern: (Zu erreichen im Raum-Netzwerk unter lampi oder 10.23.42.140.)
-
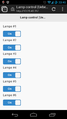
Lamp Webinterface

Lampenpositionen
-
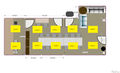
Lampenpositionen mit deren Identifikationsnummer

Mqtt
Doku
Folgende Stati werden in MQTT geschickt:
/room/light/3/command off
/room/light/1/state on
/room/light/2/state on
/room/light/3/state off
/room/light/4/state on
/room/light/5/state on
/room/light/6/state on
/room/light/7/state on
/room/light/8/state on
/room/light/3/command off
/room/light/3/command off
/room/light/3/command on
/room/light/3/state on
Linux Befehl:
$ mosquitto_sub -v -h 10.23.42.31 -t "/room/light/#"
Eine Lampe kann mit folgenden Schema geschalten werden: /room/light/<id>/command (on|off).
Unter Linux wurde das wie folgt getestet:
$ mosquitto_pub -h 10.23.42.31 -t "/room/light/3/command" -m "off"
$ mosquitto_pub -h 10.23.42.31 -t "/room/light/3/command" -m "on"
Skript
import mosquitto, os, socket, time
- File: /usr/local/sbin/light2mqtt.py
TCP_IP = '127.0.0.1'
TCP_PORT = 2001
BUFFER_SIZE = 1024
mqttBroker="10.23.42.31"
mypid = os.getpid()
client = mosquitto.Mosquitto("RoomLights"+str(mypid))
oldStates = None
def processState(ls):
	lightnr=1
	global oldStates
	for light in ls:
		if oldStates is None or light != oldStates[lightnr - 1]:
			lightState = "on" if int(light) == 1 else "off"
			client.publish("/room/light/%s/state" % lightnr, lightState, 0, True)
		lightnr+=1
	oldStates = ls
- Light ist das licht 1-6
- State ist h oder l
def switchLight(light, state):
	s = socket.socket(socket.AF_INET, socket.SOCK_STREAM)
	s.connect((TCP_IP, TCP_PORT))
	s.send("ollpew%s%s" % (light, state))
	time.sleep(0.2)
	data = s.recv(BUFFER_SIZE)
	s.close()
	data = data.replace("\r", "").split("\n")
	lightState = data[3].split(" ")[1]
	processState(lightState)


def getStates():
       s = socket.socket(socket.AF_INET, socket.SOCK_STREAM)
       s.connect((TCP_IP, TCP_PORT))
s.send("ollpera")
time.sleep(0.2)
       data = s.recv(BUFFER_SIZE)
       s.close()
data = data.replace("\r", "").split("\n")
lightState = data[2].split(" ")[1]
processState(lightState)
- getStates()
- switchLight(3, "l")
- time.sleep(2)
- switchLight(3, "h")
def on_connect(rc):
#print("Connected with result code "+str(rc))
client.subscribe("/room/light/+/command")
def on_message(userdata, msg):
	topic = msg.topic.strip("/").split("/")
	lightNr = int(topic[2])
	message = str(msg.payload)
	if lightNr >= 1 and lightNr <= 6 and message in ["on", "off"]:
		lightState = "l" if message == "off" else "h"
		switchLight(lightNr, lightState)


client.on_connect = on_connect
client.on_message = on_message
client.connect(mqttBroker, 1883, 60, True)
while client.loop() == 0:
	pass
Autostart im Raspberry:
Folgende Zeile in /etc/rc.local einfügen: (vor dem exit 0 wenn vorhanden)
- Start the monster deamon to rule the world
/usr/bin/python /usr/local/sbin/light2mqtt.py &