
Ueberschalter: Unterschied zwischen den Versionen
Aus C3MAWiki
Weitere Optionen
Ollo (Diskussion | Beiträge) →Web: new Webinterface available, see Github |
Ollo (Diskussion | Beiträge) |
||
| Zeile 16: | Zeile 16: | ||
== Software == | == Software == | ||
* raspbian (wheezy) | * raspbian (wheezy) | ||
** | ** python | ||
** lighttpd (optional für Webclient) | ** lighttpd (optional für Webclient) | ||
*** Webserver-Projekt [https://github.com/C3MA/uberschalter Unterordner web] | *** Webserver-Projekt [https://github.com/C3MA/uberschalter Unterordner web] | ||
Version vom 27. Januar 2019, 19:16 Uhr
Dies ist ein Projekt, an dem momentan aktiv gearbeitet wird. Wenn du Fragen hast oder mitarbeiten möchtest, wende dich an Ollo.

Publikationen
Server
Hardware
- Raspberry Pi seriell stumm geschalten
- ioBoard Projekt auf Github
Das ioBoard wird über das UART des Raspberry Pis angesprochen. Die Kommunikation zum Raspberry erfolgt über Ethernet, es werden keine weiteren Schnittstellen benötigt.
Software
- raspbian (wheezy)
- python
- lighttpd (optional für Webclient)
- Webserver-Projekt Unterordner web
Konfiguration
In der Konfigurationsdatei /etc/ser2net.conf von ser2net aktiviert man folgende Konfiguration. Alle weiteren können auskommentiert werden:
2001:raw:120:/dev/ttyAMA0:9600 NONE 1STOPBIT 8DATABITS -XONXOFF -LOCAL -RTSCTS
Webserver konfigurieren
$ cd /var/
$ sudo chown pi:pi www/
$ cd cd /var/www/
$ git clone https://github.com/C3MA/uberschalter
$ cd uberschalter/web/
$ make
Aktualiseren der lighttpd Konfiguration zu folgender (Muss ggf. erst installiert werden):
server.modules = (
	"mod_cgi",
	"mod_access",
	"mod_alias",
	"mod_compress",
 	"mod_redirect",
#       "mod_rewrite",
)

#server.document-root        = "/var/www"
server.document-root        = "/var/www/uberschalter/web/www"
server.upload-dirs          = ( "/var/cache/lighttpd/uploads" )
server.errorlog             = "/var/log/lighttpd/error.log"
server.pid-file             = "/var/run/lighttpd.pid"
server.username             = "www-data"
server.groupname            = "www-data"
server.port                 = 80


index-file.names            = ( "index.php", "index.html", "index.lighttpd.html" )
url.access-deny             = ( "~", ".inc" )
static-file.exclude-extensions = ( ".php", ".pl", ".fcgi" )

compress.cache-dir          = "/var/cache/lighttpd/compress/"
compress.filetype           = ( "application/javascript", "text/css", "text/html", "text/plain" )

# default listening port for IPv6 falls back to the IPv4 port
include_shell "/usr/share/lighttpd/use-ipv6.pl " + server.port
include_shell "/usr/share/lighttpd/create-mime.assign.pl"
include_shell "/usr/share/lighttpd/include-conf-enabled.pl"

$HTTP["url"] =~ "/cgi-bin/" {
        cgi.assign = ( "" => "" )
}

cgi.assign      = (
        ".cgi"  => ""
)
Client
Android
Lampenpositionen
-
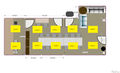 Lampenpositionen mit deren Identifikationsnummer

Mqtt
Doku
Folgende Stati werden in MQTT geschickt:
/room/light/3/command off
/room/light/1/state on
/room/light/2/state on
/room/light/3/state off
/room/light/4/state on
/room/light/5/state on
/room/light/6/state on
/room/light/7/state on
/room/light/8/state on
/room/light/3/command off
/room/light/3/command off
/room/light/3/command on
/room/light/3/state on
Linux Befehl:
$ mosquitto_sub -v -h 10.23.42.10 -t "/room/light/#"
Eine Lampe kann mit folgenden Schema geschalten werden: /room/light/<id>/command (on|off).
Unter Linux wurde das wie folgt getestet:
$ mosquitto_pub -h 10.23.42.10 -t "/room/light/3/command" -m "off"
$ mosquitto_pub -h 10.23.42.10 -t "/room/light/3/command" -m "on"
Und hier das Sammel-Topic für die Werkstatt:
$ mosquitto_pub -h 10.23.42.10 -t "/room/light/w/command" -m "off"
$ mosquitto_pub -h 10.23.42.10 -t "/room/light/w/command" -m "on"